
Start fishing in Welcome to Elderfield by speaking to Herb at the Lakefront, accepting his Old Fishing Rod, and loading Worms through the bait's Use option. Interact with suitable water, wait for a bite, then press confirm while the moving cursor overlaps the blue target area. Successful inputs fill the separate progress bar at the top.
Reach Herb at the Lakefront
The early route to the Lakefront goes through the sewer entrance in the park. If a town exit does not let you walk directly to the lake, follow that sewer route instead. Prepare for the journey before going in, since reaching the fishing area can involve danger even though the fishing lesson itself is straightforward.
Find Herb by the Lakefront and speak with him about fishing. When he asks whether it interests you, choose the positive response, “That sounds like fun.” He gives you an Old Fishing Rod and some Worms, then asks you to bring him a Ghost Flounder.
You do not need to buy a better rod before this introduction. Herb's starter rod is sufficient for the first lake objective. If you reached the water before talking to him, the message that you need a fishing rod is a prompt to find the fisherman, not a reason to search the equipment shop for an expensive upgrade.
Prepare the rod and bait
Keep the fishing rod in your inventory and select Use on the bait you want to load. Carrying bait alone is not enough: the game tracks what is equipped on the rod. For the first Ghost Flounder attempt, load Worms.
Use the rod's own interaction to check the currently loaded bait. This is especially useful after a trip to the Mall or sewers, where you may have changed to another type. The bait left on the rod can explain a rejected cast even when suitable Worms are sitting elsewhere in your inventory.
| Message or state | What to check |
|---|---|
| A fishing rod is required | Carry the rod obtained from Herb |
| No bait is equipped | Select Use on a suitable bait item |
| Wrong bait | Match the loaded type to that body of water |
| Fishing has started but nothing is happening | Wait for the bite and the timing minigame |
| The minigame ends immediately | Stop pressing at random and wait for blue-area alignment |
When changing bait, check the resulting loaded type and remaining inventory. Earlier versions returned the previously loaded bait when a new type was equipped, but the current behavior is not confirmed here. Verify your own counts if you are managing a small supply rather than assuming a swap has consumed or preserved everything.
Make the first cast
Stand facing a usable fishing spot and interact with the water. A straight approach is the best starting point, particularly when using a controller. A September 2026 demo update corrected controller selection of diagonal fishing targets, so old controller behavior can differ from an updated build.
Once the cast starts, wait. The pause before a bite is part of fishing, not an invitation to press confirm repeatedly. The timing minigame begins when the fish bites, and that is when your inputs start to matter.
Rain makes fish bite faster in the introductory fishing rules. It does not guarantee the fish species you want or make every result a large catch. You can use a rainy trip to spend less time waiting, while still checking the bait and any conditions for your target.
Waiting time was adjusted in the September 2026 demo fishing rework. Do not use a fixed number of seconds from an older playthrough as a test that the current cast has failed. Watch the game state and the appearance of the minigame instead.
Read the two parts of the minigame
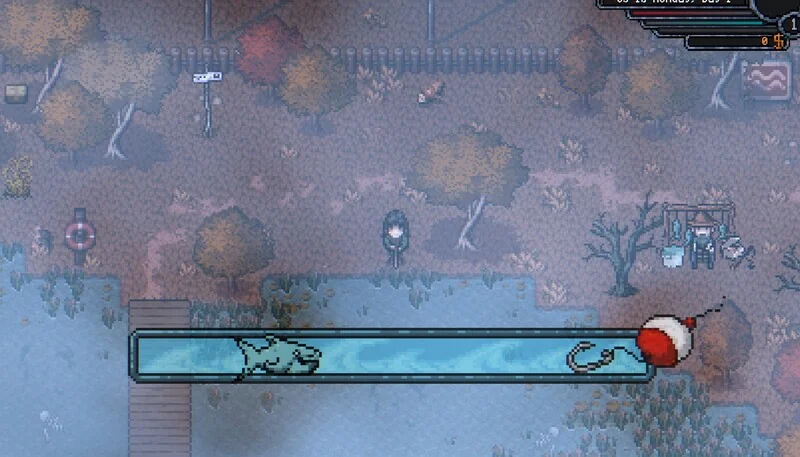
The blue target area is the place where the moving cursor needs to line up. The progress bar at the top measures how close you are to landing the catch. These two elements have different jobs, and understanding that difference makes the tutorial much easier to follow.
Press the displayed confirm or OK input while the cursor overlaps the blue area. A correctly timed input adds progress. Continue matching your inputs to the cursor until the progress bar fills and the catch completes.
Avoid pressing immediately when the minigame opens unless the cursor is actually aligned. Early random inputs can reduce progress to zero and end the attempt. That failure can look like a fish escaping before you had a chance, when the immediate button presses were the cause.
Use the current game's displayed input for your control method. Keyboard, mouse, and controller prompts should be read in their own context, rather than assuming one named controller button applies to every layout. The underlying task is the same: time the confirmation to the blue target.
Practice with deliberate inputs
For your first attempts, focus on identifying the blue area and watching the cursor's movement before pressing. A brief pause to understand the pattern is more useful than clicking as quickly as possible. The objective is successful alignment, not a high number of inputs per second.
If an attempt fails, distinguish between a timing failure and a bait problem. Wrong bait prevents the appropriate fishing interaction before the catch minigame. A progress bar that collapses during the minigame means you reached the timing stage and should adjust the inputs you make there.
Catching a different fish from the one in your task is a third situation. It means the cast and minigame can succeed, but the result was another member of that water's catch selection. Recheck the target's bait and conditions without treating a successful unwanted catch as proof that the controls are broken.
Complete Herb's Ghost Flounder objective
Keep Worms loaded and fish at the Lakefront for Ghost Flounder. Other catches can appear while you work toward it. A Worm does not promise that the next completed minigame will produce the task fish, so bring additional bait if you want a longer attempt.
Once you have a Ghost Flounder, keep it and return to Herb. The introductory task teaches recipes including Tempura, Ghost Flounder Soup, and Ghost Broth. It then moves on to a Fog Eel challenge, which introduces a different bait choice.
Follow the Ghost Flounder task and cooking guide if you are unsure which fish request is active. A separate task called Ghostly Catch has a gold-quality-or-better requirement. That condition should not be applied automatically to Herb's first lesson.
Check the task wording before using or selling the catch. An early demonstration kept the fish after showing it to Herb, but that is not a guarantee that every fish task preserves the item. The safe planning step is to complete the relevant conversation before committing the fish to cooking or sale.
Switch to Leeches for Fog Eel
Herb identifies Leeches as the useful bait for his Fog Eel challenge. Load them and continue at the Lakefront. This is a change to the fish you are targeting, not a request for a different rod tier.
Leeches affect the relevant lake catch chances; they do not turn every cast into a Fog Eel. Other fish can still appear. The Leech supply and bait guide explains replenishment and why a Bait Pack does not guarantee a particular result.
A September 2026 demo bug affected some bait-specific catches, and the following update corrected the specialized bait bonus. If you are following an older experience in which large amounts of Leech bait seemed ineffective, check the build before assuming that your setup must be wrong. The fix does not remove ordinary randomness from fishing.
Showing Herb the Fog Eel advances the lesson and teaches fish recipes including Baked Fish Fillet and Fog Broth. This connects fishing to cooking objectives. Keep the relevant ingredients if another character is already asking for a prepared dish.
Make room for your catch
Leave inventory space before a dedicated fishing trip. The introductory rules warn that a full inventory requires you to drop an item to make room for the catch. Deciding what to leave at home is easier than making that choice after landing a useful fish.
Keep the rod and appropriate bait, along with the supplies needed for the journey to the water. Store materials that do not contribute to that trip. If you are fishing for a task, allow room for the named fish rather than filling every slot with unrelated exploration pickups on the way.
Fishing can produce more than a standard single catch. Large fish, higher-quality fish, extra items, and treasure are part of the system, with outcomes influenced by factors including Luck, weather, and Fishing level. Those possibilities are another reason to leave some flexibility in your inventory.
Do not use one unusually profitable trip as a fixed income forecast. The actual fish, quality, and other results can vary between attempts. When your objective is a quest item, reaching that objective is a clearer stopping point than chasing the same value as your best earlier catch.
Replenish fishing bait
The General Store's Bait Packs provide a renewable way to obtain early bait. The pack contains random bait, so opening one can produce a type other than the one needed at your current destination. Read the contents and then choose where they are useful.
Wormsprout gives farming another role in bait supply by producing Worms. Use the Wormsprout growing guide when you want the farm to support future Lakefront trips. A crop is a future supply route, while an opened pack may provide something you can use immediately.
Bait can also appear during exploration and in character interactions. Treat incidental finds as additional supply, not as proof that the same object or character always gives a fixed daily amount. Keep the bait that fits your next objective and save other useful types for the locations that accept them.
Match bait to the early fishing locations
Different water accepts different bait. The Lakefront and nearby Radio Station waters use Worms or Leeches. Early sewer fishing uses Maggots, while the Mall F1 Hallway pool uses Bugs.
| Destination | Early bait choice | Example objective |
|---|---|---|
| Lakefront | Worm | Herb's Ghost Flounder request |
| Lakefront | Leech | Herb's Fog Eel challenge |
| Radio Station waterside | Worm or Leech | Additional lake fishing |
| Sewers F1 | Maggot | Sewer fish such as Slimefish or Rot Puffer |
| Mall F1 Hallway | Bug | Stalktopus for the Office Worker's request |
The Mall task is part of wider progression involving the Mall Administrator. Adrian's Tentacle Cleanup request opens the back-hallway route with a key, and the fishing request takes place in that area. The axe upgrade walkthrough explains why this fishing detour can matter when you are trying to earn a Basic Axe.
Before walking to a different body of water, change the bait to match the destination and check that the needed route is open. More of the wrong bait will not make an incompatible spot accept the cast. This small equipment check prevents a return trip for a problem that can be fixed before leaving.
Rod upgrades and later waters
Later fishing areas require stronger rods. The recorded progression uses Sturdy Fishing Rod for the Old Woods Campsite and Quality Fishing Rod for Catacombs waters. These are tool requirements, separate from any Fishing skill you gain by landing catches.
Earlier upgrade recipes use the Old Fishing Rod with Copper and Iron Bars for Sturdy, then Sturdy with Hardwood and later crystal materials for Quality. Exact release-build quantities are not confirmed here. Check the current forge recipe before collecting materials, and retain the earlier rod required by the next tier.
The Campsite uses Dragonflies for ordinary fishing, with Lugworms tied to its fishing-contest conditions. Catacombs fishing uses Fireflies. These later bait types are a reason to review the water and event requirements rather than treating a large supply of early Worms as a universal solution.
If you are blocked by the route itself, use the Old Woods access guide or Catacombs entry walkthrough. Upgrading the rod and opening the region are separate tasks. Complete the missing one instead of repeatedly returning to a gate with better equipment alone.
Seasons, time, and versions
Some fish depend on the season or time of day. The game uses Season of Rebirth, Season of the Harvest, Season of the Witch, and Season of Death. A later seasonal fish selection includes catches that were absent from older demos, so two versions need not produce identical lists at the same lake.
Exact day-and-night boundary times differ in older fishing information. Do not apply one universal cutoff to every fish without checking its own current requirement. This matters particularly when chasing a seasonal fish near dawn or dusk, where an hour can change the relevant conditions.
For the initial Herb lesson, concentrate on the demonstrated Lakefront route and matching bait. Once you pursue a named seasonal or event fish, inspect those additional conditions before spending a long bait supply. A festival fish or contest fish can require its event to be active even when your rod and bait are otherwise suitable.
The basic fishing loop remains the same across those objectives: reach compatible water, load the right bait, wait for a bite, and time inputs within the blue area. Change the part of the setup that your next fish requires. You do not need to relearn the entire activity each time a task sends you somewhere new.
Back to top